Wednesday, July 6, 2011

Avoiding Buyer's Remorse

A couple of weeks ago we loaded up the 4Runner and set out on the 2 hour trek to IKEA in Roundrock. We were getting a sink cabinet for our bathroom remodel (details upcoming) and a new dresser for Ivory's room. Note to future parents: Don't buy a small child's dresser/chest of drawers when your babies are born because as soon as your babies are toddlers, you'll need to upgrade to a larger one to contain their stuff. Then you'll find yourself making the all-too-common Duplicate Purchase, which equals money down the drain. If you go ahead and buy an adult-sized dresser (in terms of storage space, not height, necessarily) when you're stocking your nursery, you can use the top as a diaper-changing area while you've got a teeny tike (if it's the longish-shortish kind) and use any large drawers for diaper or other baby paraphernalia storage, AND you'll avoid the duplicate-purchase-cash-suck that inevitably comes with buying certain specialized kids' items.  So, we were on our way to Roundrock to make a Duplicate Purchase.

Here is the small child's dresser we bought about two years ago:


The white plastic squares adhered to the left side are remnants of childproofing (why I wanted to keep the child out of her own dresser is beyond me. I think it had something to do with preventing a topple, but I'm afraid it also had a lot to do with not wanting to find her clothes strewn about her room after I'd had my head turned, which I now know is a completely futile struggle).  It's about 4 feet tall and about 2 1/2 feet wide and the drawers are about 4 inches deep. Well, more like 12 inches, but still, pretty shallow.

About a month ago we realized we wanted something bigger so we began looking around at antique shops. I found a really cool chest of drawers, but at $350 it was too expensive, especially since it needed to be refinished. I didn't go to any thrift stores. Honestly, I hear stories and read blogs about people finding great stuff at thrift stores, but when i go, the furniture section invariably looks like the set of Empty Nest. And since I'm rarely in the market for a mauve dresser with gold metallic trim, I seem always to come up short. Maybe I'm just looking in the wrong places...

Anyway, since I didn't find anything locally, I had planned to get a Hemnes dresser from IKEA.


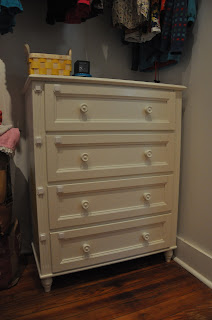
I have one in the espresso finish in my bedroom and I've been really pleased with the quality and the storage space. When I walked up to the dresser in IKEA, though, I got a "this isn't quite right" feeling. The dresser is a bit too tall and the corners are really sharp. I should have known this going in because I have one, but I didn't take the time to look at it critically until I was about to spend $ for another one. I kinda hate not loving something I've gone to the store specifically for because it means that something I've considered "done" is still pending. I especially dislike having this feeling at IKEA because getting there and shopping there are both such hugely exhausting productions (damn those all-wheel-drive carts!!!), but if there's anything I've learned about shopping, especially shopping for our home, I really have to have a "this is completely the right thing" feeling before I purchase or I'll almost always end up regretting it and selling it for half of what I paid at a yard sale two years later when I'm finally able to admit it was a mistake. So, I made peace with the idea that the dresser search was still on and continued toward the bathroom section. Fortunately for my to-do list and my sanity, I didn't take 10 steps before I saw it: the Nyvoll dresser. I was immediately hit with the "this is completely the right thing" feeling. I just had to check the price. It was $299, not cheap at all but the same price as the Hemnes so not any more than we had already planned to spend. It was shorter and much more interesting and Mike and Ivory loved it too. Also, the drawer fronts can easily be wiped clean after Ivory colors on it. Also, Mike would like me to add that it has "futuristic self-closing drawers" which it does.  Score! Consider it "done."
Of course it took about a week before we got it out of the box and then about 2 hours to put it together (I hate putting together drawers!) but the final result was worth it. Behold, the grown-up dresser for the toddler's room:


So for me, the moral of the story is Don't Buy ANYTHING You Don't Completely Love Because You'll Regret It and Waiting for the Right Thing is SO MUCH More Rewarding Than Going with the Almost Right Thing. Most of the time you won't find the thing that you want less than 10 steps from the thing you thought you wanted or the thing you were convincing yourself would work, but it's still worth it to wait. (Krystal and Julie: These principles apply to men, too.)

Love,

Katherine

Friday, July 1, 2011

What Color Are Your Curtain Rods?

A while ago I decided on a color palette for our Master Bedroom.
Now you may be thinking, "Geez, this woman must have a lot of free time and a total lack of concern for Libya to be consuming herself with such banalities!"  Rest assured, I AM concerned about Libya and whatever's going on there, but I happen to believe that a comfortable, aesthetically pleasing home makes a difference in my and my family's quality of life so yes, color palettes do take up a bit of space in my brain, as you can see barely make out below:

Anyway, we decided to use Valspar's Ice Rink Blue as the wall color, with bright white trim and gold and orangey-reddish-coral as accents. Instead of searching for pieces in stores that happened to be the perfect shade, we chose the obvious solution: to spray paint other stuff orangey-reddish-coral.

The first to get painted were our curtain rods! Here's an in-progress picture of the Master now - Including the lopsided pillows, a result of Mike's un-photogenic decision to use a Tempur Pedic pillow.


We chose to leave the curtain rods a little long on the ends because we liked the look. The rods are Umbra Loft from Target, one of the only inexpensive places I've been able to find rods with flat finials (which you can see in better detail by clicking on the photo above), which I prefer to the ornate rounded or square kind. I wanted to post a link to the rods on the Target website, but I'm afraid they may be discontinued as I can't find them on the Umbra website either. I found them in my local store and they still have them, so perhaps they're available at a Target near you as well! Here's a photo of the packaging for your reference:


And here's how we painted them:

1. We searched for spray paint in the right shade. Rust-O-Leum and Krylon are good choices for basic colors because they're readily available, but if you're looking for something a bit more unique and Bahama Blue isn't cutting it, we've found Montana spray paint can be a good choice. Because it was created for artists, they carry high quality paint in an excellent variety of colors. The Gold series, which we used, is spray acrylic, as opposed to spray enamel, so that's another plus. A graffiti supply shop in San Antonio called The Yard carries Montana spray paint so we're lucky to be able to get it locally. It's available online here, too, though the shipping is pricey so perhaps Googling where to find it locally is your best option. Check out the link to the online store, though, because the color selection really is impressive.

2. Once we had our perfect color :


3. We had to shake it for "3 min."


4. Then we had to remove the little black ring under the spray cap (inside knowledge Michael is privy to because he works with this paint regularly as he is himself an artist).


5. Then we set up the bracket so we could spray each side that would be showing evenly and at the same time.


6. By getting a little creative, we were able to set up the poles in a similar fashion. Michael just shoved the wire from an old campaign sign through the pole and allowed it to lean over to keep it from sliding all the way to the bottom. 


7. Then we painted.


We ended up using two coats on each piece. We allowed 24 hours of drying time between the coats and about 36 hours of drying time afterward. We wanted to be sure we didn't get any orange residue from partially dry paint on our white curtains.
We also took care when installing the rods because they did chip easily. We had to bring one pole back outside for another coat before we learned to handle them very gently. Since we don't plan to open and close these curtains, we don't have to worry about wear and tear over time.


Fortunately our experiment paid off! We're completely pleased with the finished product! We love the unexpected pop of color and we love that it only cost $7 for the spray paint!

Let me know if you end up painting your curtain rods! I'd love to see pictures.

Love,

Katherine