Wednesday, August 29, 2012

Drapes Refreshed!

A while ago I bought custom white canvas drapes with privacy lining for my daughter's bedroom from Smith and Noble. At the time I wasn't aware of the wide array of possibilities for making your own awesome drapes, so I bought these custom drapes for a pretty, pretty penny. They were window-length and double the width of the window. Oooh la la, fancy pants. However, with the privacy lining, this made for extremely heavy drapes. Every time we tried to close them, two or three of the hooks came out of the drapery rings and we were left with this:


It's hard to tell from the picture, but the right panel is drooping sadly off it's drapery rings. 

I really liked the look of the double-width because when we could get them closed, they still looked full and dramatic. Ooh la la, again. But ultimately, ease-of-use won out and I put the drapes in storage and replaced them with cheapo privacy shades from Home Depot. I won't go into the buyer's remorse regret I chided myself with for several months. Anyway. I liked the simplicity of the shades by themselves for a while, but I wanted to add interest and a little femininity. This is, after all, my daughter's room. Lately I've been trying to use what I have in the house instead of buying new stuff, so pulled the old drapes out to see what I could do with them.

I knew the curtain rod had to be more substantial, so I bought an inexpensive, thicker curtain rod from Target and spray-painted it white. The difference was small but noticeable. I ended up using the same drapery rings that went with the original PBTeen Curtain Rod, even though they are off-white, because I don't mind mixing my whites. 

I also knew I wanted the drapes to be floor length. I love the color-blocking trend that we've been seeing all over the place for the past year, ever since I saw these Jill Sander pieces in her Spring 2011 show. So I decided to use this as my inspiration and add bright-colored fabric to the bottom of these drapes. I was nervous, but I think the end result is great:


I think this is a great way to create floor-length drapes if you have really tall ceilings like we do. 96" drapes are still about 6 inches from our floor when hung above the window as pictured. The longer 108" drapes are too long, way more expensive, and harder to find. 

Here is how I did it:

I had this watermelon fabric in my fabric cupboard and I knew I wanted to use it. I also plan to use it to make headboards for both my girls when they eventually share a room. When I laid out the giant, double-width drape I knew I would not have enough fabric for this project and the drapes. I decided to use just one of the double-width panels cut in half. Since I knew each panel was made up of two standard-width panels sewn together, I figured this would be as easy as ripping the seam.

I spread the panel out seam-up over my ironing board and began ripping the seams of both the privacy lining and the canvas with my seam ripper. After a while, I realized it would just be faster to cut the existing seam right below the stitching to get a relatively straight line and to avoid having to pull out all those nylon threads.


The top was a big of a challenge, but I just continued to cut along the seams until the panels were separated.

The next step was to hang the curtains and determine how much fabric I needed to add to the bottom.
I safety pinned the fabric at different levels on the drapes until I had the right proportion. I used the Rule of Thirds, loosely, and placed the pink fabric so that it would make up, more or less, the bottom third of the drape.


I marked the level with a pencil. Next, Stitch Witching. Stitch Witchery is super-awesome, super-foolproof and super easy to use. All you need is an iron with a steam setting. And it's not really permanent. If you make a mistake, you can just rip it up. Perfect! I love this stuff. I stitch-witched the top and bottom of the pink fabric to create clean hems.


Then I carefully placed the pink fabric over my pencil marks on the canvas panel and stitch-witched it to the panel. Next, I stitch-witched hems on the raw sides of the canvas panels that I had separated. This was challenging, too, but if you're adding fabric to single panel store-bought drapes, you won't have to do this.

I'm so pleased with how it turned out, and in a rare moment of domestic productivity, I actually completed both drapes in two days! What?! I once stitch-witched a hem in one panel to adjust the length and left the other one unhemmed for over a year. And by "once" I mean last year.

Love,

Katherine


Wednesday, July 6, 2011

Avoiding Buyer's Remorse

A couple of weeks ago we loaded up the 4Runner and set out on the 2 hour trek to IKEA in Roundrock. We were getting a sink cabinet for our bathroom remodel (details upcoming) and a new dresser for Ivory's room. Note to future parents: Don't buy a small child's dresser/chest of drawers when your babies are born because as soon as your babies are toddlers, you'll need to upgrade to a larger one to contain their stuff. Then you'll find yourself making the all-too-common Duplicate Purchase, which equals money down the drain. If you go ahead and buy an adult-sized dresser (in terms of storage space, not height, necessarily) when you're stocking your nursery, you can use the top as a diaper-changing area while you've got a teeny tike (if it's the longish-shortish kind) and use any large drawers for diaper or other baby paraphernalia storage, AND you'll avoid the duplicate-purchase-cash-suck that inevitably comes with buying certain specialized kids' items.  So, we were on our way to Roundrock to make a Duplicate Purchase.

Here is the small child's dresser we bought about two years ago:


The white plastic squares adhered to the left side are remnants of childproofing (why I wanted to keep the child out of her own dresser is beyond me. I think it had something to do with preventing a topple, but I'm afraid it also had a lot to do with not wanting to find her clothes strewn about her room after I'd had my head turned, which I now know is a completely futile struggle).  It's about 4 feet tall and about 2 1/2 feet wide and the drawers are about 4 inches deep. Well, more like 12 inches, but still, pretty shallow.

About a month ago we realized we wanted something bigger so we began looking around at antique shops. I found a really cool chest of drawers, but at $350 it was too expensive, especially since it needed to be refinished. I didn't go to any thrift stores. Honestly, I hear stories and read blogs about people finding great stuff at thrift stores, but when i go, the furniture section invariably looks like the set of Empty Nest. And since I'm rarely in the market for a mauve dresser with gold metallic trim, I seem always to come up short. Maybe I'm just looking in the wrong places...

Anyway, since I didn't find anything locally, I had planned to get a Hemnes dresser from IKEA.


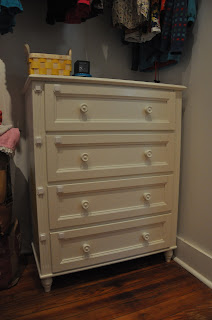
I have one in the espresso finish in my bedroom and I've been really pleased with the quality and the storage space. When I walked up to the dresser in IKEA, though, I got a "this isn't quite right" feeling. The dresser is a bit too tall and the corners are really sharp. I should have known this going in because I have one, but I didn't take the time to look at it critically until I was about to spend $ for another one. I kinda hate not loving something I've gone to the store specifically for because it means that something I've considered "done" is still pending. I especially dislike having this feeling at IKEA because getting there and shopping there are both such hugely exhausting productions (damn those all-wheel-drive carts!!!), but if there's anything I've learned about shopping, especially shopping for our home, I really have to have a "this is completely the right thing" feeling before I purchase or I'll almost always end up regretting it and selling it for half of what I paid at a yard sale two years later when I'm finally able to admit it was a mistake. So, I made peace with the idea that the dresser search was still on and continued toward the bathroom section. Fortunately for my to-do list and my sanity, I didn't take 10 steps before I saw it: the Nyvoll dresser. I was immediately hit with the "this is completely the right thing" feeling. I just had to check the price. It was $299, not cheap at all but the same price as the Hemnes so not any more than we had already planned to spend. It was shorter and much more interesting and Mike and Ivory loved it too. Also, the drawer fronts can easily be wiped clean after Ivory colors on it. Also, Mike would like me to add that it has "futuristic self-closing drawers" which it does.  Score! Consider it "done."
Of course it took about a week before we got it out of the box and then about 2 hours to put it together (I hate putting together drawers!) but the final result was worth it. Behold, the grown-up dresser for the toddler's room:


So for me, the moral of the story is Don't Buy ANYTHING You Don't Completely Love Because You'll Regret It and Waiting for the Right Thing is SO MUCH More Rewarding Than Going with the Almost Right Thing. Most of the time you won't find the thing that you want less than 10 steps from the thing you thought you wanted or the thing you were convincing yourself would work, but it's still worth it to wait. (Krystal and Julie: These principles apply to men, too.)

Love,

Katherine

Friday, July 1, 2011

What Color Are Your Curtain Rods?

A while ago I decided on a color palette for our Master Bedroom.
Now you may be thinking, "Geez, this woman must have a lot of free time and a total lack of concern for Libya to be consuming herself with such banalities!"  Rest assured, I AM concerned about Libya and whatever's going on there, but I happen to believe that a comfortable, aesthetically pleasing home makes a difference in my and my family's quality of life so yes, color palettes do take up a bit of space in my brain, as you can see barely make out below:

Anyway, we decided to use Valspar's Ice Rink Blue as the wall color, with bright white trim and gold and orangey-reddish-coral as accents. Instead of searching for pieces in stores that happened to be the perfect shade, we chose the obvious solution: to spray paint other stuff orangey-reddish-coral.

The first to get painted were our curtain rods! Here's an in-progress picture of the Master now - Including the lopsided pillows, a result of Mike's un-photogenic decision to use a Tempur Pedic pillow.


We chose to leave the curtain rods a little long on the ends because we liked the look. The rods are Umbra Loft from Target, one of the only inexpensive places I've been able to find rods with flat finials (which you can see in better detail by clicking on the photo above), which I prefer to the ornate rounded or square kind. I wanted to post a link to the rods on the Target website, but I'm afraid they may be discontinued as I can't find them on the Umbra website either. I found them in my local store and they still have them, so perhaps they're available at a Target near you as well! Here's a photo of the packaging for your reference:


And here's how we painted them:

1. We searched for spray paint in the right shade. Rust-O-Leum and Krylon are good choices for basic colors because they're readily available, but if you're looking for something a bit more unique and Bahama Blue isn't cutting it, we've found Montana spray paint can be a good choice. Because it was created for artists, they carry high quality paint in an excellent variety of colors. The Gold series, which we used, is spray acrylic, as opposed to spray enamel, so that's another plus. A graffiti supply shop in San Antonio called The Yard carries Montana spray paint so we're lucky to be able to get it locally. It's available online here, too, though the shipping is pricey so perhaps Googling where to find it locally is your best option. Check out the link to the online store, though, because the color selection really is impressive.

2. Once we had our perfect color :


3. We had to shake it for "3 min."


4. Then we had to remove the little black ring under the spray cap (inside knowledge Michael is privy to because he works with this paint regularly as he is himself an artist).


5. Then we set up the bracket so we could spray each side that would be showing evenly and at the same time.


6. By getting a little creative, we were able to set up the poles in a similar fashion. Michael just shoved the wire from an old campaign sign through the pole and allowed it to lean over to keep it from sliding all the way to the bottom. 


7. Then we painted.


We ended up using two coats on each piece. We allowed 24 hours of drying time between the coats and about 36 hours of drying time afterward. We wanted to be sure we didn't get any orange residue from partially dry paint on our white curtains.
We also took care when installing the rods because they did chip easily. We had to bring one pole back outside for another coat before we learned to handle them very gently. Since we don't plan to open and close these curtains, we don't have to worry about wear and tear over time.


Fortunately our experiment paid off! We're completely pleased with the finished product! We love the unexpected pop of color and we love that it only cost $7 for the spray paint!

Let me know if you end up painting your curtain rods! I'd love to see pictures.

Love,

Katherine

Wednesday, June 29, 2011

Does it work? Seventh Generation Dishwashing Liquid vs. Cascade Complete

This is the first in a series of posts where I'll submit my opinions about the effectiveness of various organic products. If you've used many organics, you probably know their effectiveness can vary - and who wants to spend (sometimes extra) cash on something that doesn't end up working, organic or not? (A la most laundry stain removers - I'm talking to you, Shout.) We're not 100% organic consumers (hence the Shout), but I try to use natural products when I can. In the end, though, my bottom line is,  Does it work?


And for Seventh Generation Automatic Dishwasher Gel, the verdict is:


 It works! 


We've been using Seventh Generation Free and Clear for a few weeks now and have not noticed any difference between it and Cascade Complete. My dishes are spot-free and as clean as ever and whadayaknow, I'm not coating my dishes with a thin film of who-knows-what-kinds of chemicals (phosphates) each time I wash them. Incidentally, Cascade has a phosphate-free variety which I have also tried and found to be much less effective than either Cascade Complete or Seventh Generation.


The free and clear variety is our favorite because we're kind of sensitive to fragrances over here - we prefer our dishes smelling like dishes, but to each his own. The detergent also comes in Lemon scent and Green Apple (unexpected, eh?), if I'm not mistaken.


Now for the kicker: As if reducing our exposure to possibly-carcinogenic chemicals wasn't enough, Seventh Generation Automatic Dishwasher Gel is actually only a teensy-weensy bit more expensive than Cascade complete. It's $3.77 for 42 oz. here (Mom, that link's for you) as opposed to Cascade which is $6.27 for 75 oz. - about $.02 more per oz. or less than $1 more per container.  A small price to pay for fewer chemicals in your body, right?


So, consider us converted. We're not adding any substantial expense to our grocery budget AND we're removing one more toxin from our home and our water supply. That's what we call a win, win my friends. 

Update: A friend of mine told me she's used Seventh Generation before and wasn't pleased. I think they've recently introduced a new formula, though, so if you're like her and have tried it before with lackluster results, maybe try it again!


Love,


Katherine

Monday, June 27, 2011

On Your Way Home From Work Today, Swing by Target Because You Need a Pre-Seasoned Cast-Iron Skillet


Waking up with a craving for pancakes is no unusual thing for me. When it happens, if we have time and want to spend the money on a meal out, we rouse the child (she sleeps until 9 AM!) and cart her to our local breakfast chain. Until recently, this worked like a charm; I’d leave the restaurant with my quarterly pancake craving satiated.  But lately I’ve been super unimpressed with restaurant pancakes. I eat them, I eat the egg or the bacon or whatever they come with and I just walk away feeling…full. At first I thought it was circumstantial, like maybe I was just eating "emotionally" and not even a delicious pancake could make me feel satisfied. Then I thought all the Barefoot Contessa and Gwyneth Paltrow recipes I’ve been preparing have turned me into a food-elitist and I’ll never be satisfied by a chain restaurant pancake again. Then I thought it might be the fake Aunt Jemima-ish syrup most restaurants serve instead of real maple syrup, but upon further reflection, I don’t think the syrup can make or break the pancake. Finally I thought it might be the chain. Perhaps they changed their recipe? I’ve been around long enough to see really popular products change their packaging or their recipes and to see well-loved cosmetics inexplicably discontinued, so I really thought I might have found my solution: I’d try a place in San Antonio famous for its pancakes and abandon my attempt to find a great pancake at a chain.
Ivory and I drove 15 minutes outside of town for this pancake.  It wasn’t a big deal at the time, but to see it in writing makes it seem like I may have been a teensy bit obsessed. Anyway – the restaurant smelled like the nail salon next door, which automatically registered as not great. We shared a short stack and scrambled eggs and…. Nothing.  I was amazed that people wait in line for hours on the weekends for these pancakes.
So, it finally dawned on me that I should try to make the darn things at home. I’d made pancakes at home before, but I’d always thought restaurant pancakes were better. Since that was obviously no longer the case, I decided I should up the ante and buy a deluxe pancake mix hoping to match the restaurant quality of yore. I bought a brand that looked pretty fancy to me and proceeded to make several batches of pancakes on several mornings spread out over a period of several weeks, each one more disappointing than the last. I didn’t think it could be the mix because a pancake is a tricky thing to get just right. I assumed I had been cooking them too long on one side or not long enough on the other or mixing the batter too thick or too thin or using too much or too little heat.  Then one morning, I decided to pull out all the stops and make them from scratch. Also, I was out of pancake mix.
I Googled a recipe and found one that looked simple enough and which didn’t require buttermilk, since I never keep it in the house. Unfortunately I don’t have the link for the recipe because I can’t remember where I found it, but if the person who came up with it happens upon this blog (sha right) I will gladly give him or her credit if he or she should email me demanding it. 
Anyway, I cannot tell you (though I will proceed to try) how delicious these pancakes were. (Take that last statement to heart or not, depending on your sensitivity to too high expectations.) Though the original recipe did not call for using one, I buttered up my cast iron skillet on medium-high heat and cooked each quarter-cupful for 2 minutes on either side. The result was a freaking awesome pancake with a slightly crunchy, buttery shell and a deliciously fluffy interior. Holy cow, folks, welcome to breakfast. Seriously amazing. Michael and Ivory inhaled them and I had to restrain myself from having seconds (I’m trying to eat like a French person because I heard they don’t get fat).
I tried making them a second time in a regular non-stick skillet and let me tell you, the difference was noticeable. They were still delicious, but not blog-worthy delicious.
You’re probably wishing I had pictures of these pancakes so you could verify their existence, but unfortunately, I just started this blog and the pancake-making took place a couple of weeks ago. Next time I make them I’ll post pictures.

It’s so wonderful that the solution to my pancake dilemma ended up being something so simple. It’s way cheaper to make them from home. And it’s totally satisfying on a non-edible level to make something from scratch and have it turn out well. Who knew the satisfying-on-all-levels pancake was just a bowl full of batter away the whole time?

So, voila, here it is, the culmination of months and months of searching:

Delicious, easy, cheap, Perfect Pancakes:

In addition to the edible ingredients, you will need:
Cast-iron skillet (buy a pre-seasoned one or season it yourself. Google can tell you how to do that - Google's such a genius!)
Sifter
(You’ll also need a large bowl, liquid and dry measuring cups -if you make the distinction- and measuring spoons)

3 T. butter, melted and cooled to room temperature
1 ½ c. White Flour (you could use wheat, but after you taste them you probably won’t want to risk altering the texture)
3 ½ t. Baking Powder
1 T.     White sugar
1 ¼c.  Milk
1 egg, slightly beaten

1. Pour dry ingredients into a sifter and sift into a large bowl.  
2. Using the bottom of a ¼ cup measure, make a well in the center of the dry ingredients & pour in wet ingredients. You can either pour them in all at once if you’ve mixed them together already or you can pour them in one at a time, it makes no difference.
3. Stir until well mixed. Batter will be a little lumpy. 
4. Heat your "seasoned" cast-iron skillet  over medium-high heat for a few minutes and then melt 1 Tablespoon of butter in the pan.
4. Pour ¼ c. batter onto heated, buttered skillet. (If you’re using a griddle, it should be at 375, but don’t use a griddle) Add 1 T of butter to the pan between batches as needed.
5. Cook pancakes for about 2 minutes on one side (until small bubbles form and pop on the surface of the pancake) and about 2 minutes on the flip side.
6. Drizzle with real Maple Syrup and consume with reckless abandon.

Makes about 10 pancakes. 

I hope you enjoy these as much as I have.

Love, 

Katherine

Friday, June 24, 2011

Itsa me, Mario! Er, Katherine.


Hooray! The inaugural post of our blog!
If I had acted on the idea to start this thing when it first came to me, I might have been a little closer to the front of the blogger line instead of peering out from behind the blog in front of me only to see miles and miles of others stretched out ahead like the line for a Barefoot Contessa book signing.  Mais, c’est la vie. At least I’m finally doing it.
As someone who’s been journaling regularly for 11 years, it’s pretty exciting to me to have a multi-media record of the life and times of my family. Also, it’ll be a nice way to keep in touch.
Talking on the phone is not one of my favorite things, which means I’m sometimes really, really bad at returning phone calls and/or answering my phone in the first place. As a result, those in my second circle  (friends and family who don’t live nearby or with whom I don’t speak often enough – and actually, as a recent transplant to San Antonio, pretty much everyone I love, excluding a few notable exceptions, is in the second circle simply due to geography – and my crappy phone etiquette) are sometimes dreadfully uninformed about my thoughts on which laundry stain removers actually work and whether or not my husband and I are coexisting peacefully. I’m sure they’re losing sleep over it. This blog will hopefully help remedy that, and then some.
At any rate, I’m going to be totally honest about whatever I’m talking about because honesty is one of my favorite things.  For starters, I’ll say that I have found being married and being a mother to be the absolute hardest things I have ever done.  My husband Michael is going back to college full-time and he’s really regretting not being finished already. He says if he could go back now and go to school without having a family, he’d sail right through. If you run a mile with weights on your ankles, when you take them off it’s as if you’re flying (I mean, I assume it is).
Just like weighting your ankles for a run, being a mom is super challenging, but it's also very rewarding. In addition to stronger biceps from hoisting the babe up and down all day,  I can feel my emotional endurance building, my patience growing and my tolerance for annoying things getting higher and higher. And I miss my single life less and less. Which most of the time feels really, really good. I’m getting stronger just by being part of a family.
Anyway, I'm really glad I finally decided to start this blog because I miss, miss, miss sharing my rambling thoughts with you and feeling connected even though we may be miles apart.

Let's hunker down and get through this thing together.

And remember, no matter what happens, We Can Fix It!

Coming up: We paint our bedroom curtain rods….Red Orange! But first: More random thoughts and an awesome pancake recipe.

Love,

Katherine